Automate Mouse Cursor Randomly via Python
Automating Mouse Cursor
Disclaimer: I'm writing this post just for educational purposes and I do not support Time Theft. I think automation is pretty cool so that's why I make such stuff.
We're gonna use the library pyautogui to automate our cursor.
So let's start!
Installing the pyautogui Module
The pyautogui module can send virtual keypresses and mouse clicks to Windows, OS X, and Linux. Depending on which operating system you’re using, you may have to install some other modules (called dependencies) before you can install PyAutoGUI.
- On Windows, there are no other modules to install.
- On OS X, run
sudo pip3 install pyobjc-framework-Quartz,sudo pip3 install pyobjc-core, and thensudo pip3 install pyobjc. - On Linux, run
sudo pip3 install python3-xlib,sudo apt-get install scrot,sudo apt-get install python3-tk, andsudo apt-get install python3-dev. (Scrot is a screenshot program that PyAutoGUI uses.)
After these dependencies are installed, run pip install pyautogui (or pip3 on OS X and Linux) to install PyAutoGUI.
Before we start our script, we need to make sure it doesn't get out of control and you don't have to deal with such issues. So We'll be using some fail safes.
import pyautogui
pyautogui.PAUSE = 1
pyautogui.FAILSAFE = True
Here we import pyautogui and set pyautogui.PAUSE to 1 for a one-second pause after each function call. We set pyautogui.FAILSAFE to True to enable the fail-safe feature.
Controlling Mouse Movement
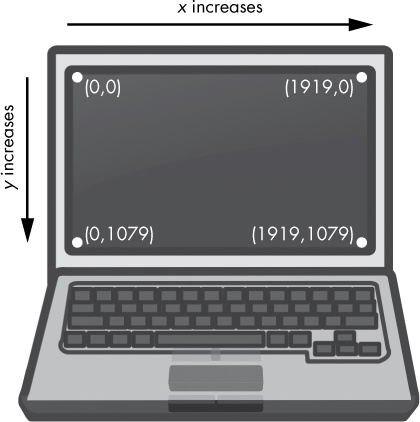
Your resolution is how many pixels wide and tall your screen is. If your screen’s resolution is set to 1920×1080, then the coordinate for the upper-left corner will be (0, 0), and the coordinate for the bottom-right corner will be (1919, 1079).
The pyautogui.size() function returns a two-integer tuple of the screen’s width and height in pixels. Enter the following into the interactive shell:
import pyautogui
pyautogui.size()
(1920, 1080)
width, height = pyautogui.size()
That's enough for basics.
Let's write our code.
Include the dependencies
import pyautogui
from time import sleep
from random import randint
Globals and failsafes
pyautogui.PAUSE = 1.5
pyautogui.FAILSAGE = True
screen_width , screen_height = pyautogui.size()
Function to get the next random position for your mouse cursor.
def getNextPos():
    x = randint(0, screen_width - 1)
    y = randint(0, screen_height -1)
    return x , y
Function to move the mouse cursor and sleep for 1 second.
def move():
    x,y = getNextPos()
    print("Moving to ({},{})".format(x,y))
    pyautogui.moveTo(x,y, duration=0.25)
    sleep(1)
Finally, the entry point
print("Press CTRL-C to Stop")
while True:
    move()
Complete code looks like this
import pyautogui
from time import sleep
from random import randint


pyautogui.PAUSE = 1.5
pyautogui.FAILSAGE = True
screen_width , screen_height = pyautogui.size()

def getNextPos():
    x = randint(0, screen_width - 1)
    y = randint(0, screen_height -1)
    return x , y

def move():
    x,y = getNextPos()
    print("Moving to ({},{})".format(x,y))
    pyautogui.moveTo(x,y, duration=0.25)
    sleep(1)

print("Press CTRL-C to Stop")
while True:
    move()
Run it using
python automate.py
